
How to Start a Blog - The Ultimate Step-by-Step Guide
In this ultimate guide, I will show you how to start a blog and tell you everything you need to know to get started blogging. Blogging has completely changed my life. I am able to work from home, I can travel whenever I want, enjoy a flexible schedule, and more.
Anyone can make money with a blog. In this article, you will learn about the first steps.
Table of contents
- STEP 1: Get Web Hosting and Register a Domain Name
- STEP 2: Set Up Your WordPress Blog
- STEP 3: Start Designing Your WordPress Blog
- STEP 4: First Steps with WordPress
- STEP 5: Keep Your WordPress Blog Safe
Why Should You Start a Blog on WordPress?
I recommend always going with WordPress, as it’s the most powerful blog creation platform. More than 40% of all websites are powered by WordPress (only around 2% of all websites are powered by Wix or Squarespace)
Never go with Wix or Squarespace. I cannot think of anything that Wix or Squarespace does better than WordPress.
You can do so much more on WordPress than on Squarespace or Wix.
WordPress has a bigger selection of themes, and you can also add a lot more functionalities using plugins than you can on Squarespace or Wix.
People who opt for Squarespace or Wix often choose them because they think they are more beginner-friendly than WordPress. They want to build a website in a matter of minutes with a drag-and-drop builder, which all these platforms have.
Indeed, WordPress does not come with a drag-and-drop builder by default, but that doesn’t mean you cannot install a plugin such as Elementor that adds responsive drag-and-drop functionality.
WordPress offers more customization options, and you can accomplish more in the long run. In all aspects, WordPress is the best choice.
Just to clarify, when I talk about WordPress, I mean self-hosted WordPress.org and not hosted WordPress.com. You always want to go with self-hosted Wordpress.org.
Self-hosted WordPress.org offers more control, flexibility, and customization options. All successful bloggers use the self-hosted WordPress.org. I have never come across any big successful blog that would be built with WordPress.com.
If you plan to start a blog that you want to share with just family and friends and you don’t plan to monetize it, then WordPress.com is fine for you. In any other case, go with WordPress.org.
STEP 1: Get Web Hosting and Register a Domain Name
To start a blog on WordPress, you need two things:
- Domain name
- Web hosting
Without these two things, you will not be able to create a blog.
Domain
A domain is like an address for a website on the internet. For example, the domain of this blog is blogginglizard.com
Every domain consists of a name and an extension separated by a dot.
The most widely used extension is .com. Other popular ones are .org and .net.
If you are starting a blog that targets an audience in a specific country, you can use a country extension like .nl (Netherlands), .de (Germany), .au (Australia), etc.
However, I always recommend using .com as it is the most used extension, and it is always good to have the option to expand your blog.
You might start targeting a specific country at the launch of your blog, but that might change in the future.
Hosting
Hosting is like renting space on the internet to store your website's files and make it accessible to the world.
When you create a website, all the images, text, and other content need a place to live, and that place is provided by a hosting service.
When someone types your website's domain name into their browser, the hosting service delivers the website's files to their device, allowing them to see and interact with your site.
In essence, hosting is what enables your website to exist and be visible on the internet.
How to Start a WordPress Blog on Bluehost
In this step, I will guide you step-by-step on how to start a WordPress blog on Bluehost. Bluehost is the most popular hosting provider.
Bluehost is a great option for beginners as it has a straightforward setup and is cheap.

1. Go to www.BlueHost.com
Go to the Bluehost website and click on the button that says “Get Started.”
Note: To avoid confusion, let's clarify the menu options on Bluehost. At the top, you'll see "WordPress" and "Hosting" labels. Under "WordPress," there's "WordPress Hosting," and under "Hosting," you'll find "Shared Hosting." But don't worry, both options are the same and cost the same. Bluehost just added the "WordPress Hosting" label to prevent people from thinking that they could not launch a WordPress website on Shared Hosting. If you still find this confusing, no problem. Just click "Get Started" and follow the next steps.

2. Select Your Plan
Once you click on the button, you’ll see four hosting plans:
- Basic
- Choice Plus
- Online Store
- Pro

I recommend choosing the cheapest Basic plan.
The Choice Plus plan would be suitable if you plan to launch more than one website. However, if you are new to blogging and just starting out, I strongly encourage you to start with one website and not scatter your attention into multiple projects.
The hosting plan selection is not a definitive decision. If you ever decide you want to have more websites, you can always upgrade to a higher plan from your account.
Some people buy the Choice Plus plan as they want to have SSL and think the Basic plan does not include it.
Even though it might seem like the Basic Plan does not include SSL, it actually includes a Free SSL powered by Let's Encrypt, which is more than enough.
Bluehost as any company, wants you to purchase the more expensive plans, but believe me that the Basic plan will be sufficient for you. Like any company, Bluehost wants you to purchase the more expensive plans, but believe me, the Basic plan will be sufficient for you.
Even if you decide to launch an online store, you can do it with the Basic plan and don't need the Online Store plan. Again, it is just a marketing tactic so people considering launching an online store buy the more expensive plan.
What I find a little strange is that, based on the pricing cards, the Basic plan does not include a Free domain for the first year, but it does. Bluehost must have forgotten to update the pricing cards.
Note: An SSL certificate is a digital security measure that changes your website's URL from "http" to "https" and adds a padlock icon next to the domain. This indicates that the data exchanged between your website and visitors is encrypted, making it safer from potential threats.
3. Choose a Domain Name
On the following page, you can create a new domain for free.
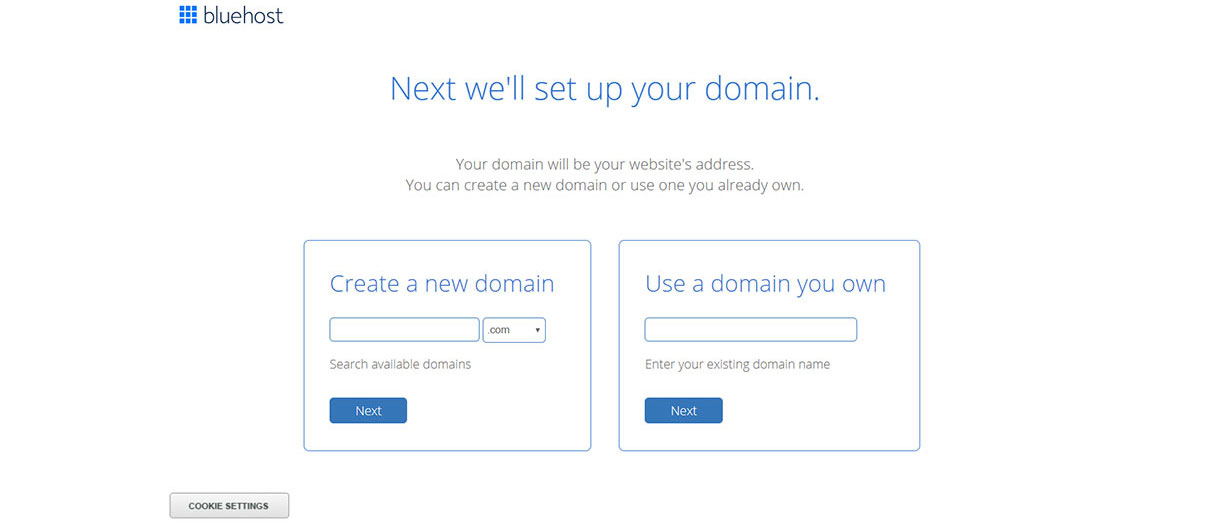
If you already have a domain name, enter it on the form on the right. It doesn’t matter where you registered it. Even if you registered your domain name on GoDaddy or another domain registrar, enter it on that form.
You can have a domain registered on GoDaddy and hosting on Bluehost.
However, you would need to connect the GoDaddy domain to your Bluehost account. It’s nothing hard. I have a short article on how to do it here.
If you get a free domain from Bluehost or previously registered a domain on Bluehost, you will not have to connect the domain to the hosting. It will be done automatically for you.
4. Fill in Your Account Information
Next, you have to fill in some information.

5. Choose the Duration of Your Plan
You have already selected your plan. Now you have to select its duration.

Bluehost allows you to choose between a 12-month and 36-month plan.
6. Choose Additional Services
Bluehost will, just like any other hosting provider, try to upsell you additional services.

Domain Privacy Protection – When you register a domain, your contact details, such as name, address, and email, are made publicly available in the WHOIS database. However, with Domain Privacy Protection, Bluehost replaces your personal information with generic contact details.
You don't need it if you are comfortable with your contact details being publicly available in the WHOIS database.
CodeGuard Basic – Bluehost performs backups of its customers' websites at its own discretion. If, for any reason, you lose your website and find that Bluehost does not have a backup, you are out of luck and will have to build your website from scratch. With SiteLock, Bluehost automatically backs up your website, allowing you to restore it in case of any issues.
I don't recommend buying SiteLock, as you can easily make your own backups with free WordPress plugins (more on it later in the article).
Single Domain SSL – Every Bluehost plan comes with a free Let's Encrypt SSL certificate. If you opt for Single Domain SSL, you get the same protection as with Let's Encrypt, but with the added benefit of a $10,000 warranty.
I personally never buy Single Domain SSL and use the free Let's Encrypt SSL certificate, which Bluehost will automatically install for you.
SiteLock Essentials –SiteLock performs automatic scans on your websites to detect and eliminate any vulnerabilities while also taking care of malware removal.
I don't recommend buying SiteLock, as many WordPress free plugins can do the same job (more on it later in the article).
Google Workspace Business Starter –If you want to have a Gmail email that matches your domain (e.g., info@fishtalesunlimited.com), you need to pay for Google Workspace.
If you don't purchase it during the sign-up for hosting, you can always purchase it later from your Bluehost account.
Yoast Premium SEO – Yoast SEO is a popular WordPress plugin that helps optimize websites for search engines. It offers various features, including content analysis, XML sitemaps, and meta tags.
I don't recommend buying Yoast Premium, as Yoast has a free version that allows you to do the most important things for free
7. Fill in Your Payment Information
Enter your payment information and check that you agree to Bluehost's Terms of Service, and hit ”Submit.”

8. Create Your Password
Finally, create a password for your new Bluehost account.


STEP 2: Set Up Your WordPress Blog
You have just created a Bluehost account, and now it’s time to set up your WordPress Blog. The beauty of Bluehost is that it simplifies the process of installing WordPress on your hosting account.
Setup Wizard
Once you sign in to your Bluehost account, WordPress will automatically be installed, and there will be a short wizard.
You will be asked to name your site, add a tagline, and pick a WordPress theme.
None of these decisions are definite, and you can change anything later.
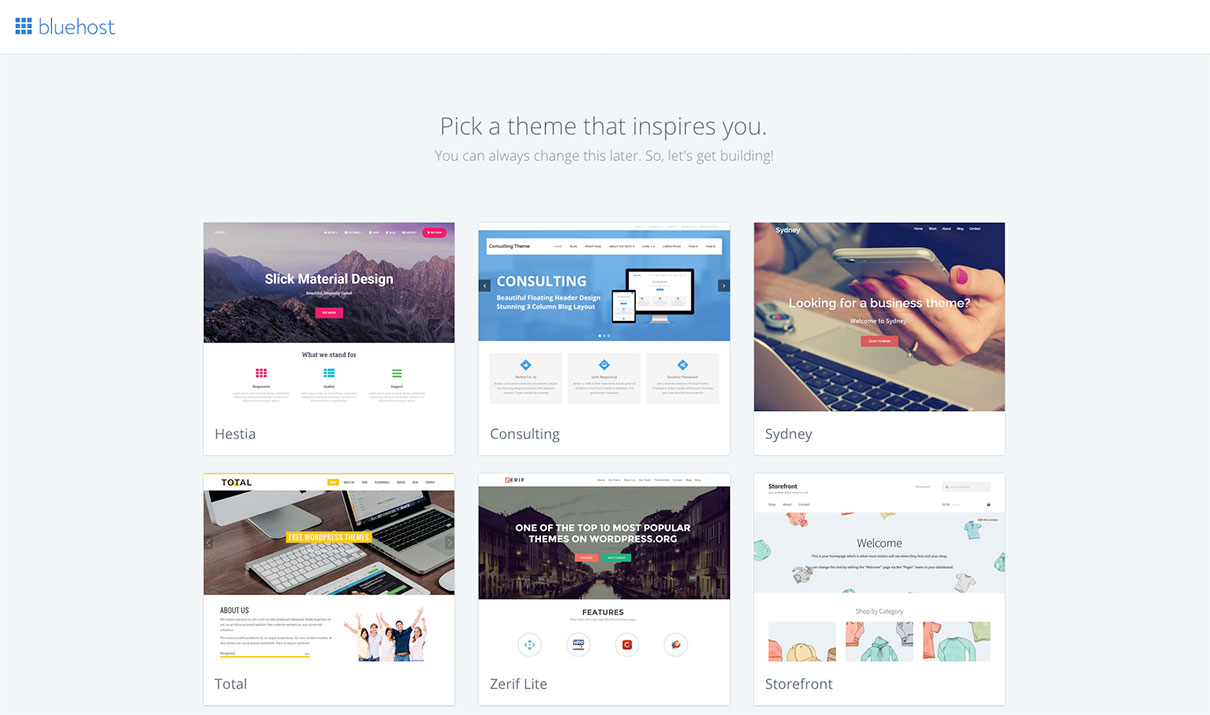
On the next screen, click on a button that says “Start Building” and you will be logged in to your WordPress dashboard.

Installation Through the Bluehost Dashboard
If, for some reason, you did not see the setup wizard when you first logged into your Bluehost account, no worries.
From your Bluehost account, click on the “My Sites” tab from the left side menu and then click the “Create Site” button.
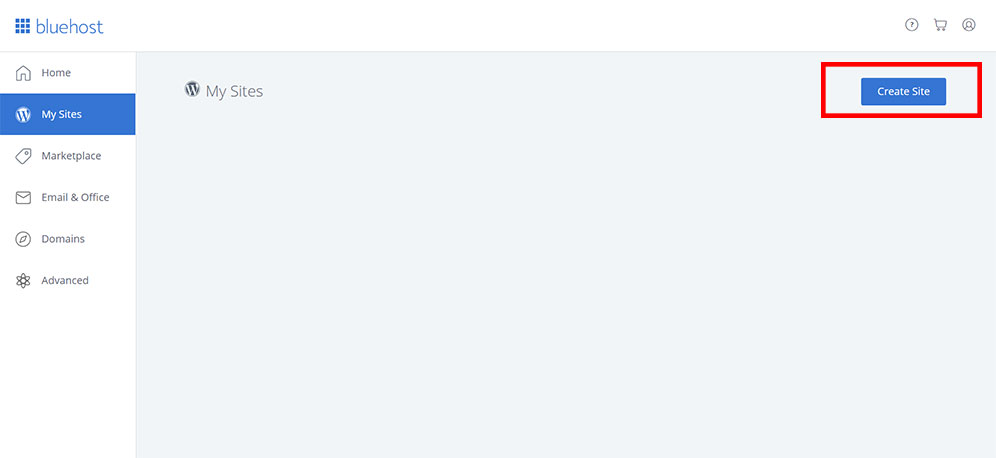
This will launch the setup wizard and install WordPress.
Once the installation is complete, click on “Log in to WordPress,” which will take you to your WordPress dashboard.

Tip: You will log in to your WordPress dashboard a lot, so it’s not very convenient to log in through your Bluehost dashboard. To access the WordPress dashboard faster, add /wp-admin to the end of your blog’s URL. For example:
awesomeblog.com/wp-admin
This will redirect you to the WordPress login page of your blog.

STEP 3: Start Designing Your WordPress Blog
Congratulations! You have just created a WordPress website.
Now is the time o design your website and add your content.
The first thing you want to do is install a WordPress theme and choose a pre-made template as a starting point.
This gives your website a certain appearance and structure without you having to do all the design work yourself.
You can either choose a free template or buy a premium one.
The main difference between them is the number of features and customization options. Free templates have very limited options but that does not mean you cannot create a good-looking website with them.
Let’s first look at the budget option - building a website with a free template.
WordPress Free Themes
Log into your WordPress dashboard and click on "Appearance". You will see your current template, a basic default WordPress template (if you choose a theme during the Blueshost auto setup, you will see the name of the template you selected).
To browser themes, click “Add New” at the top of the page. This will take you to the WordPress theme directory.

WordPress offers more than 4000 free templates, so you have much to choose from.
However, be aware that the free templates are not equal. In general, they have very limited customization options, but some give you much more options than others.
I recommend going with a freemium WordPress theme. For example, with a theme called Astra.
Astra free version has decent customization options and various free templates to choose from. Also, a lot of their templates are built with Elementor, so you can edit them with a drag-and-drop builder.
Also, if you ever later on realize that you need more options, you can always buy the premium version of Astra and continue building what you already have.
A lot of people start with a free theme but later on, realize that they need more options. Even though you can change a WordPress theme at any time, you cannot continue with a new theme where you left off. The new theme will have a different appearance and options, so you will basically have to design the whole website from scratch.
You don’t want this to happen as you would waste a lot of time.
Below, you can watch a video that shows you how to get started with Astra free template.
WordPress Paid Themes
If you want to have more customization options, you need to purchase a premium theme.
I recommend buying premium themes from reputable marketplaces like ThemeForest.
Reputable marketplaces have certain quality standards that themes must meet before being listed. This ensures that themes are free from major issues. It also reduces the chances of themes containing malicious code or vulnerabilities.
Nevertheless, there are still great differences in quality. Just because a theme is paid does not mean it automatically has a lot of customization options and is completely free of bugs.
I recommend only purchasing themes that have at least 50k sales.
If a theme has many sales, it is profitable for the theme developers, and they can afford to invest time and resources into providing consistent updates, security patches, and quality support.
If you look at the screenshot below, you can see that the first theme has over 900k sales while the other has only 671. Therefore, buying the second theme would be unwise and risky.

ThemeForest allows you to filter just the best-selling themes so you can instantly see just the quality themes and decide between one of them.

Once you buy a theme, you need to upload it to your WordPress website.
This might sound intimidating, but it is very easy.
Upon purchase, you will be able to download a ZIP file of your theme. On ThemeForest, you would hover over your name at the top right corner and click on "Downloads."
When you click on it, you will see the theme you purchased together with a download button. Hover over the button and click on "Installable WordPress file only."
Also, download the theme purchase code, as you will need it later.

To upload and install the theme, go to your WordPress dashboard and click on Appearance. Then click on “Add New” at the top of the page.
Next, click the “Upload Theme” button and select the theme ZIP file. Your theme will be uploaded, and then click on “Install Now.”

Once the theme is installed, click on “Activate.”
That’s all there is to it. You have just installed a premium theme.
New options will appear in your WordPress dashboard when a theme is installed and activated.
The first thing you will want to do is choose one of the pre-made templates your theme offers.
You might need to first enter your theme purchase code.
STEP 4: First Steps with WordPress
Your theme has been successfully installed, and now it's time to become familiar with WordPress.
WordPress is a powerful platform, but if you haven't worked with it before, learning how to use it can feel a bit overwhelming.
In this step, I will help you learn the basics to get you started.
Changing the Blog Title and Tagline
Perhaps you've already selected your blog title and tagline using the Bluehost setup wizard. However, as I mentioned earlier, you have the flexibility to modify your blog title and tagline at any point. This can be easily done by navigating to Settings » General.
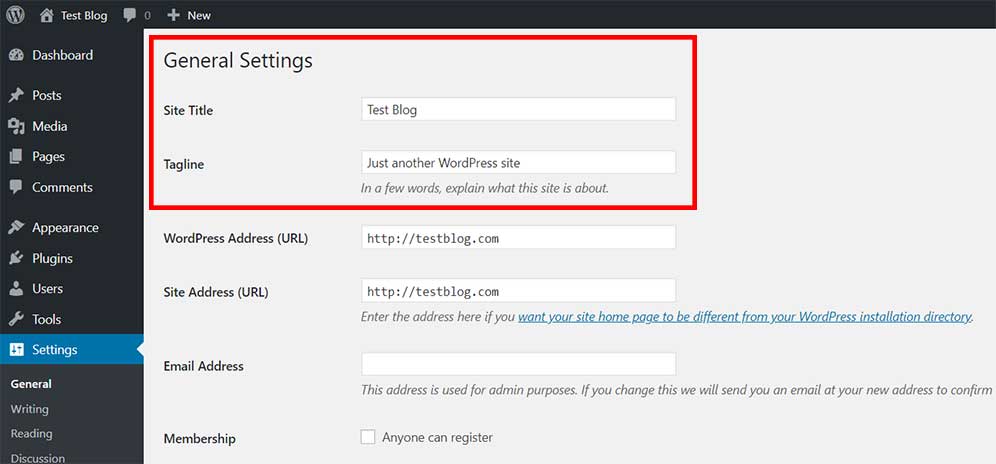
Titles and taglines help visitors, but also search engines understand what your website is about. They should communicate your website’s focus or niche.
Both title and tagline are important for search engine optimization (SEO).
Setting a Homepage
After installing WordPress, all your posts will show up on your homepage by default. Some bloggers appreciate this standard configuration, as it ensures their most recent articles receive maximum visibility. On the other hand, certain bloggers opt for a static homepage. You can decide how your homepage will appear by going to Settings » Reading.
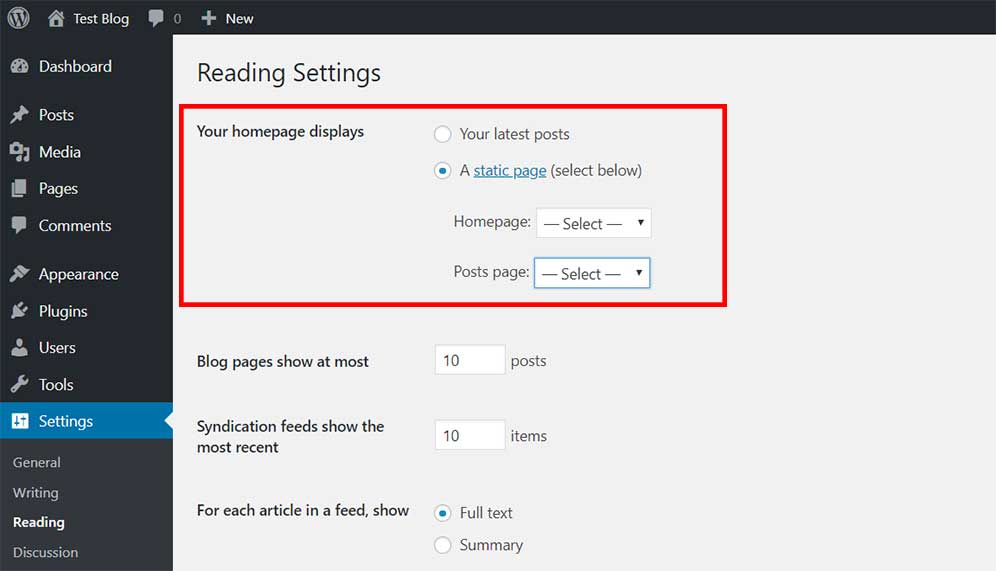
If you installed a theme and imported a template, your website will already have pages and one of them will be selected as "Homepage". Typically the page will also be called "Home" or "Homepage".
Nevertheless, you can set any page you like to be your homepage.
Best WordPress Permalink Structure
The permalink structure is an important SEO factor, so it’s vital that your blog uses the correct one. Fortunately, WordPress made the most SEO-friendly structure the default option not that long ago, so you don’t have to change anything.
The best permalink structure is the one named “Post name.” This structure is short, and it includes just your post name (your keywords).

Head to Settings » Permalinks and double-check that the right permalink structure is selected.
Avoid using dates in your permalinks at all costs.
When you use dates, you expose dated material. People will assume your article is outdated when they see it in the URL, even if the content is still relevant. A timeless permalink structure, such as "Post name," ensures that your content maintains its relevance regardless of when it was published. This makes your website appear more current and authoritative to both readers and search engines.
Difference Between Posts and Pages
Within WordPress, content creation can take two primary forms: through pages and posts. It's crucial for all WordPress users to understand the key distinction between them.
In essence, posts constitute your dynamic blog content, while pages comprise static content.
What does that mean?
Posts inherently possess a published date and can be organized into categories. Posts are essentially articles.
Pages don’t have a published date: they are timeless. A typical example of a page would be an "about" page or "contact" page.
WordPress Navigation Menus
The navigation menu helps visitors navigate your blog and find your content. Menus can be created at Appearance » Menus.
By default, you can add pages, posts, categories, and custom links to your navigation menu.
Your navigation menu will primarily consist of pages (about and contact page, resources page, etc.).
Custom links are usually used when you want to point to content that is not on your website. Let’s say you sell a book on Amazon. You could add a link to your Amazon listing with the label "Buy Book" to the navigation, and this way, promote your book.
So how do you create a menu? First, you need to create a new menu (if your theme already has some menus, just select the one you want to edit). Go to Appearance » Menus, name your new menu, and click on the button "Create Menu." Next, follow these steps:
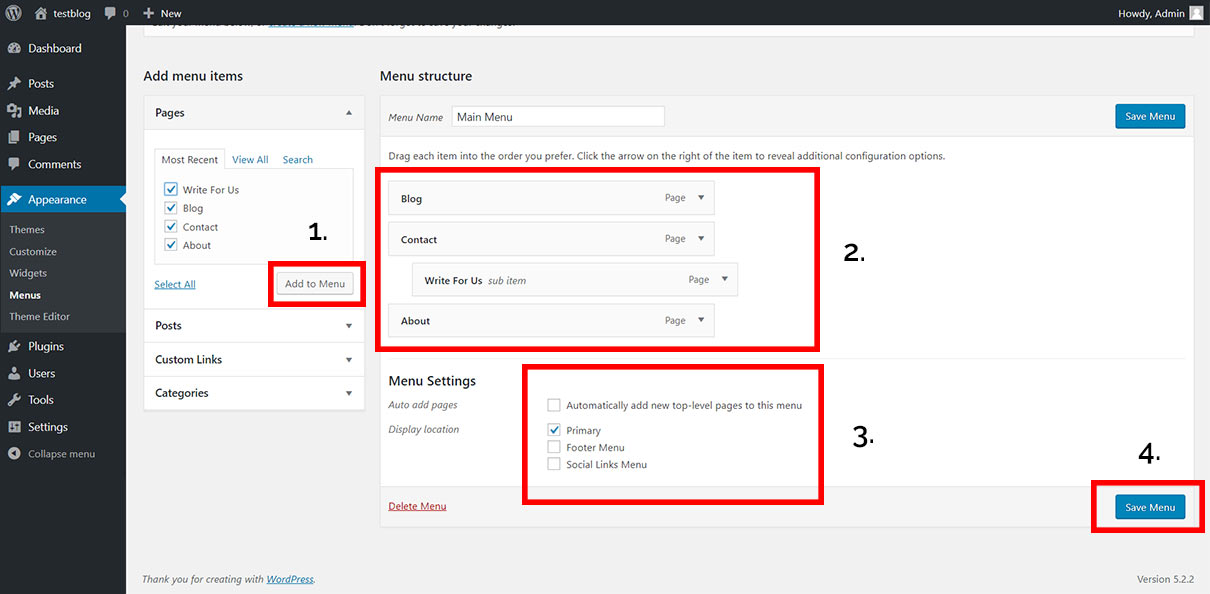
1) Select the items that you want to add to the menu and click on the “Add to Menu” button.
2) If you want to adjust the display order, simply drag and drop the items where you need them. If you want to create a sub-item, drag an item and place it under the item you need (slightly to the right).
3) Select the display location.
4) Don’t forget to hit ”Save Menu”.
What are WordPress Widgets?
WordPress widgets are used for adding content/features to specific sections of your blog, enhancing its functionality and layout. These sections, often referred to as widget areas, are predefined regions of your website's interface where you can insert widgets. Widgets can be used to display information, features, or interactive elements, such as a list of recent posts, a search bar, etc.
Premium themes often have more widgetized areas built into them.
You can add widgets at Appearance » Widgets.
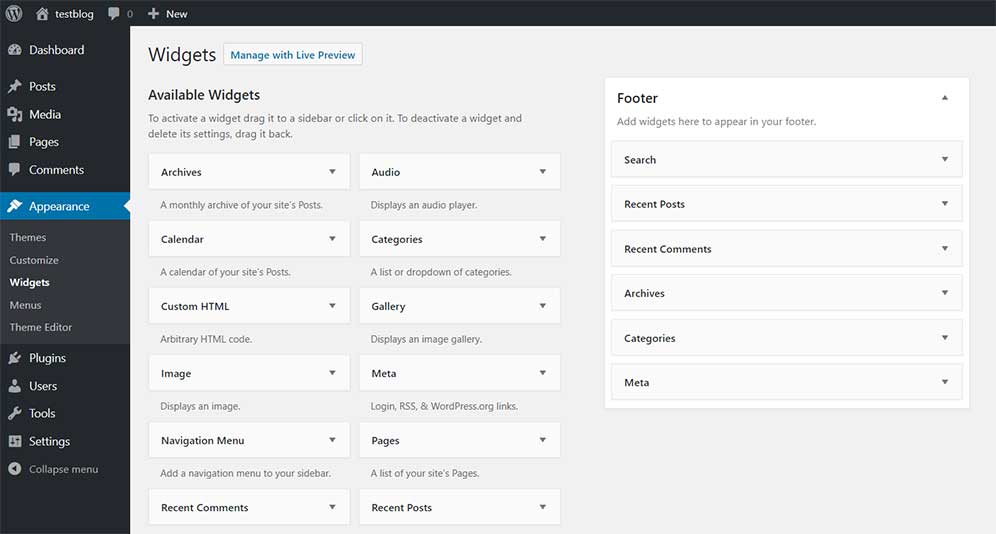
Below, you can see examples of widgets on a blank new WordPress installation (default WordPress theme).

What are WordPress Plugins?
People who are new to WordPress often find themselves confused about the distinction between widgets and plugins, so let's clarify that right away.
In essence, widgets are a specific type of content or feature that you can easily add to designated areas of your site's layout, while plugins are more comprehensive tools that offer various functionalities and can affect multiple aspects of your website's behavior.
For instance, consider a scenario where you'd like to add floating social media icons to enable sharing. As this feature isn't inherently integrated into WordPress, you'd need to download a plugin to introduce this capability to your website.
You can install plugins at Plugins » Add New.

Tip: Installing too many plugins on your WordPress blog is not a good idea. Having too many plugins can slow down your site, and it increases the vulnerability of your blog.
STEP 5: Keep Your WordPress Blog Safe
WordPress is the most popular platform for creating websites in the world. This makes WordPress a big target for hackers. Thousands of WordPress blogs are being hacked daily, and you don’t want yours to be one of them.
How do WordPress Blogs Get Hacked?
WordPress blogs are often hacked through plugins, themes, hosting, and weak passwords.

Themes
You should never install a free theme found on the Internet. Free themes often have hidden malware or a virus that can damage your files. The only safe place for downloading free templates is the WordPress theme directory.
When buying a premium theme, check that the theme is regularly updated by the theme authors before buying. If a theme is not regularly updated, then the chances of your blog being hacked are high.
If you follow my previous advice to only purchase best-selling themes, you will have a theme that is updated regularly.

Don’t forget to update your theme. You can have the best theme in the world with regular updates, but if you don’t install the updates, it is useless.
Once a new update is available, you will see it in your WordPress dashboard (Dashboard » Updates).
You will just click on "Update," and the theme will get updated.
WordPress Core
WhatPress core refers to the fundamental and essential framework of the WordPress platform. It encompasses the core code, structure, and functionalities that make up the base of the WordPress software.
Updates and enhancements to the WhatPress core are regularly released to improve security, performance, and introduce new features.
Once a new update is available, you will see it in your WordPress dashboard (Dashboard » Updates).
Before installing a WordPress core update, it is advisable to make a backup of your website as WordPress core updates can potentially cause compatibility issues with your themes or plugins (it has never happened to me on any of my websites, but it is good to be prepared for the worst).
I will show you how to make backups in a moment.
Plugins
Plugins are the number one reason why WordPress blogs get hacked, so it's essential to approach plugin management with careful consideration.
Outdated or poorly-coded plugins might have security flaws that hackers can exploit to gain unauthorized access to your site.
To mitigate these risks:
Select Reliable Plugins: Only download plugins from reputable sources, such as the WordPress Plugin Repository. Check the number of installations and ratings. Stay away from new plugins with few installations.
Active Development: Choose plugins that are actively maintained and regularly updated. Abandoned plugins are more likely to have security vulnerabilities. In WordPress Plugin Repository, you will see when a plugin was lastly updated. Try to avoid plugins that have not been updated in more than 6 months.
Regular Updates: Keep your plugins up-to-date. Just like with themes and WordPress core, you must install the available updates.
Once a new update is available, you will see it in your WordPress dashboard (Dashboard » Updates).
Limit Quantity: Avoid overloading your blog with unnecessary plugins. Every plugin adds a potential entry point for hackers. The fewer plugins you have, the better.
Delete Unused Plugins: Remove plugins you no longer need. Remember that deactivating a plugin is not enough. If you're not using a plugin, deactivate it and then delete it.
You can do so from Plugins » Installed Plugins.
Hosting
Many hosting providers are out there, but not all of them do a good job securing their servers. Always use reputable hosting providers like Bluehost. Big companies have the resources to follow the latest security standards.
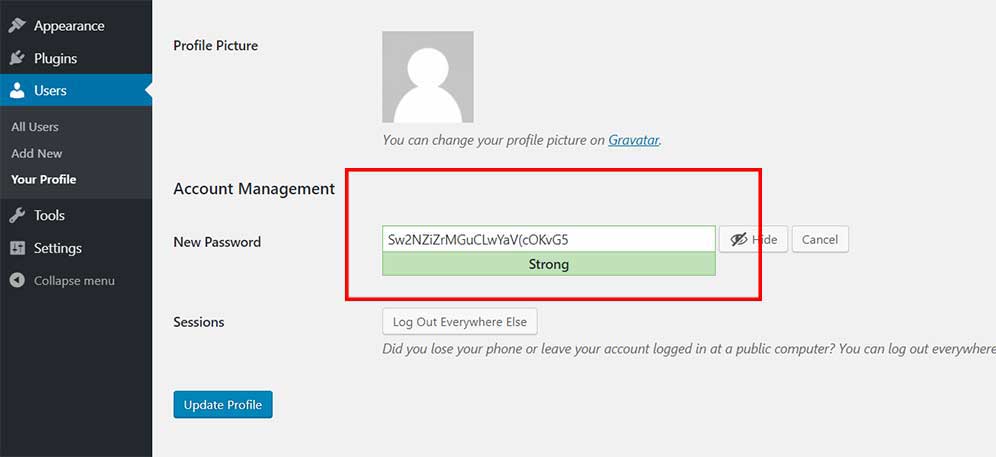
Password
You can have your theme and all your plugins updated and have secure hosting, but if your WordPress password is weak, then your blog will always be vulnerable to hacking.
A hacker will use "brute force" techniques to systematically guess your password. This involves trying various combinations of characters until they discover the right one.
Craft passwords with a mix of upper and lower-case letters, numbers, and symbols. The longer, the better.
Don't recycle passwords from other accounts; use a unique one for your WordPress blog.
The best practice is to utilize generated passwords. These passwords are lengthy and contain a combination of numbers and special characters.
When a hacker attempts to breach your website using "brute force," they must possess knowledge of both your WordPress username and password.
Therefore, it's crucial to thoughtfully construct your username.
Steer clear of using "admin" as your username. This is a common choice and can make it easier for attackers to guess one-half of the credentials they need.
To increase the security of your website even further, I recommend installing a plugin called "Limit Login Attempts Reloaded."
This plugin limits the number of retry attempts when logging in (per each IP), making a brute force attack nearly impossible.

Install a Security Plugin
Security plugins help you protect your WordPress blogs from malware and hacking attempts. Installing a security plugin should be one of the first things you do on a new WordPress installation.
There are many good security plugins to choose from like Sucuri, Wordfence, or iThemes Security.
I personally like and use Wordfence.
WordPress is a freemium plugin, but on a new blog, the free version is more than sufficient.
I upgrade to Wordfence Premium once a website starts making money.

Please note that you should always install just one security plugin. Installing more than one could cause issues.
Install a Backup Plugin
Being prepared for the worst-case scenario is always a good practice. Even though you may have secured your website, there's still a chance it could be hacked.
In the unfortunate event of a breach, without a backup, all your hard work could be lost.
To mitigate this risk, make sure to install a backup plugin that can automatically create backups of your website.
For this, I recommend installing a plugin called "UpdraftPlus."

UpdraftPlus allows you to set up automatic backup schedules. It will also help you restore your site in case something bad happens.
Conclusion
If you've reached this point, congratulations, new blog owner! You have learned how to start a blog and a lot about WordPress.
Now that you have successfully launched your WordPress blog, the most important thing is ahead of you: generating quality content and drawing the first traffic to your blog.
Content is king, and no matter how good-looking your website is, without quality content, your blog will be read only by your mother.
Educate yourself on WordPress and blogging continuously, but not at the expense of generating content for your blog. I know many people who have started their first WordPress blogs and then spent months perfecting the design, researching what plugins they should install, and how they could monetize the blog.
It's best to begin blogging and creating content as soon as possible and continue your education while on the journey.
Take action, and don't let the pursuit of perfection or excessive research delay your progress. The most valuable experience and learning come from the actual process of writing, publishing, and engaging with your audience. Remember, your blog's success will primarily be built upon the quality and consistency of the content you provide.

I have read countless tutorials on starting a WordPress blog these last couple of years and this one is definitely one of the very best! It is given to you straight…its concide and has excellent tips. I’m almost ashamed to admit that this is the first time I have ever read about securing the blog. Nonetheless, I appreciate the time you have taken to share your expertise…very much! I know you wrote this some time ago and I hope that time has brought you success and prosperity. Thanks again! 🙂
Thank you very much Michelle. I really appreciate the kind words and I am happy that the article helped you 🙂
Hi
I am Benjamin Kwateng and I come from Ghana, West Africa. I just chanced upon your website few days ago and I thrilled and captivated by the quality of the contents of the blog. Please I will be privileged to learn from one of the great mentors like.
I have sent you an email twice but haven’t received any response from you yet. I look forward to hearing from you and to learn a great deal from you.
Hi Benjamin,
hope you are well. To which email have you sent the messages? I have not received any emails from you.
Thank you for your instructions.
I am glad you found the article useful Nishan
your blog is so interesting ,i want to learn about you and your way to success on internet ,please send me an email about your courses and all the stuff you are doing .I want to learn.
THANKS .
Thank you for the kind words. I have just started publishing FREE mini-course. You can check the first one here:
https://www.blogginglizard.com/courses/how-to-pick-a-niche/
Many more will follow
Awesome.what niche is best to start with for someone who is new to blogging?
How does one generates contents easily?
I recommend checking my FREE mini-course on how to pick a niche:
https://www.blogginglizard.com/courses/how-to-pick-a-niche/